Page 1 of 1
revamped lava, now in tileset form
Posted: 14 Apr 2013, 22:19
by straelyn
A little something I did that I thought I'd share. It can tile into all sorts of funky shapes now. Although the transitions may not be perfect, I think even as-is, the look works somehow.

- lava.png (16.36 KiB) Viewed 3732 times
here's a shot of it tiled:

- 2013-04-14-171601_469x300_scrot.png (57.43 KiB) Viewed 3732 times
Re: revamped lava, now in tileset form
Posted: 15 Apr 2013, 06:31
by Jenalya
When looking at the mapped lava lakes, you can see very clearly where a tile starts and ends. In order to make it look good, it's needed to change the pattern of the lava, so it doesn't have such remarkable parts which makes the eyes notice the grid.
See here for a more detailed explanation of what I mean:
http://www.petesqbsite.com/sections/tut ... apter2.htm
Re: revamped lava, now in tileset form
Posted: 15 Apr 2013, 08:19
by meway
Try making the tile larger maybe x32 is to small of a tile and more difficult to make a seamless edge. For example x64 and x96 or larger can be great ways to getting the effect you want. Here is an example of an x96 image that I drew for lava. As it doesn't look great for individual tiles it covers allot of surface area and will direct less attention to seams.
lava.png This image is not a proper tileset neither is it seamless, its just an example to show how a bigger surface area can distract somebody playing from the existing seams.
lava2.png is an edited version of lava.png to give it more of that seamless effect we are looking for.
Re: revamped lava, now in tileset form
Posted: 15 Apr 2013, 12:58
by Crush
meway wrote:Try making the tile larger maybe x32 is to small of a tile and more difficult to make a seamless edge. For example x64 and x96 or larger can be great ways to getting the effect you want.
I made bad experiences which such large tilesizes. The problem is that when you want to allow mappers to work on a per-tile precision level, you have to create a lot of different edge tiles which will result in a very confusing tileset.
A better way to break up monotonous areas is to create some variations of the center tile. When you do that you should copy the original center-tile, erase the central 30x30 pixels and draw it again. By keeping the border you make sure that it is still working together with all tiles which worked together with the original.
Re: revamped lava, now in tileset form
Posted: 15 Apr 2013, 15:44
by straelyn
what a great tip


- 2013-04-15-104408_569x402_scrot.png (128.05 KiB) Viewed 3662 times
(I tweaked some of the edges too)
Re: revamped lava, now in tileset form
Posted: 15 Apr 2013, 21:37
by Nard
The problem with editing such small tiles is to fulfill the requirements:
- The tiles must be a period in both directions: the assembly result is a periodic image.
- you must not notice the period in the assembly.
Thus the image must end as it begins in both vertical and horizontal directions or you will notice edge discontinuities.
The size of the contrast variations must be much lower than the tile size ( let's say less than 1/10); or the eye will notice periodicity instantly.
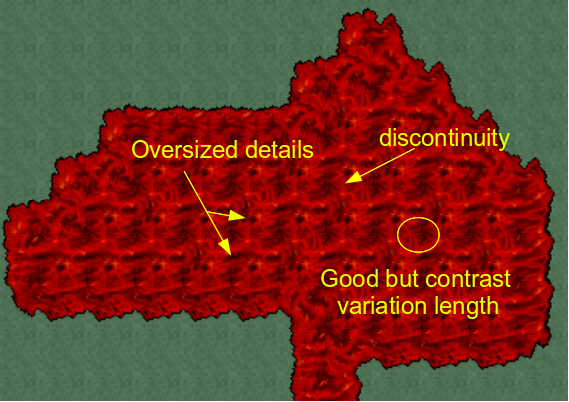
- lava.png (127.54 KiB) Viewed 3638 times
A work around could be to combine two tilesets of different sizes, one on ground and a transparent one on ground2 to modulate intensities.
These remarks obviously do not apply when you have to design textures which are (almost) periodic by nature: wooden floors, bricks, stone walls, ceramic tiles...
I found this which might be helpful (I didn't try it yet):
NeoTextureEdit(an open source software(GNU LGPL v. 3))


Re: revamped lava, now in tileset form
Posted: 15 Apr 2013, 21:40
by straelyn
and yet another update


- 2013-04-15-163530_593x499_scrot.png (175.38 KiB) Viewed 3636 times
Re: revamped lava, now in tileset form
Posted: 16 Apr 2013, 13:16
by baseballboy
Re: revamped lava, now in tileset form
Posted: 16 Apr 2013, 15:32
by straelyn
wow, that animation looks super cool!
I must've missed it.
Honestly I took this on as more of an exercise than an actual attempt to get it implemented. I figured I'd post my results just in case.
I'd say I learned a lot in the whole process. Something I played around with in one of the levels I designed was putting a layer of lava below ground, and having semi-transparent cracks/whatever in the ground where it would show through. Here's an example of what I came up with:

- 2013-04-16-102925_591x488_scrot.png (132.82 KiB) Viewed 3593 times
I'm up to 3 floors so far. Here's the first floor:

- 2013-04-16-103206_375x532_scrot.png (47.3 KiB) Viewed 3593 times